Showing posts with label Evaporated Milk. Show all posts


BM #132 Week 2 Day 1 - 

This week I shall showcase some of the dishes popular during the colorful festive season of Holi.

Thandai in any form is the beverage of choice during the festival of colors, Holi. I have here a variation to the traditional Thandai with the use of Gulkhand (Rose preserves).
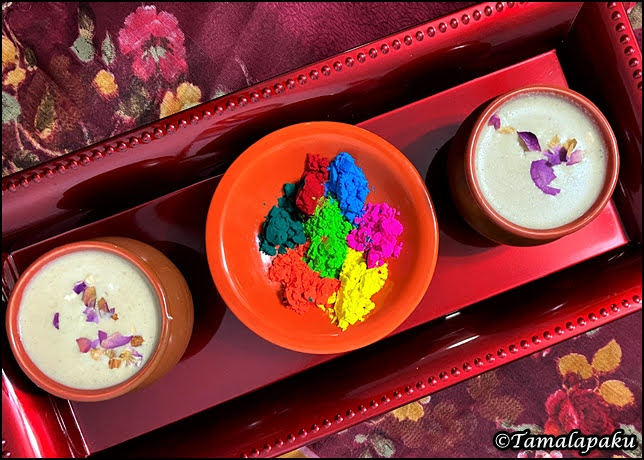

Ingredients - 

For Thandai Masala Paste - 
Almonds 1/2 cup
Cashews 1/2 cup
Gulkhand 1/2 cup
Poppy Seeds 1 Tbsp
Fennel Seeds 1 Tbsp
Black Peppercorns 1/2 tsp
Cardamom  6 to 7
Nutmeg Powder  1/4 tsp
Saffron Strands  10 to 15
Dates 8-9
For Thandai - 
Milk 4 cups 
Evaporated Milk 1 can (14 oz)
Water 2 cup
Sugar 1 Tbsp ( or to taste)
For Garnish -
Chopped Almonds
Chopped Cashews
Dried Rose Petals
Saffron strands
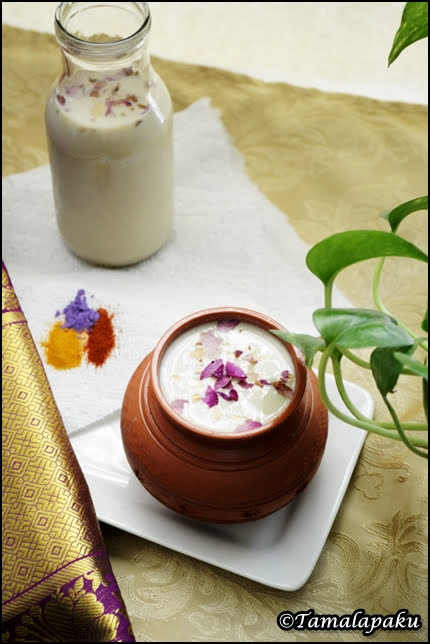

Method Of Preparation -

To make the Thandai paste, soak all the ingredients listed under '
For Thandai Masala Paste' in sufficient water for about 4-5 hours.  

Drain and grind all the ingredients into a fine paste using a high power blender adding as much water as needed.

Meanwhile boil 4 cups of milk adding evaporated milk and allow it to cool.

Mix the thandai masala paste in the boiled and cooled milk. Add sugar as needed. Mix well and refrigerate for atleast 4-5 hours.

Check for the flavor and serve cold garnishing with chopped nuts and crushed dry rose petals.


BMLogo


Preparation Time 15 minutes + Cooling time 5-6 hours
Makes 2 liters

Read More

Gulkhand Semiya Kheer

BM #73 Week 1 Day 3 - 

For the last recipe for Holi this year, try this rose flavored semiya kheer which will please your senses and remind you of the upcoming spring season!

Gulkhand is a sweet preserve of rose petals widely used in Ayurveda, for treating a wide range of ailments. It is very aromatic and stress buster as well. It is a coolant and reduces acidity and other digestion related problems.

So the addition of gulkhand in semiya kheer makes it an exotic sweet dish which can be served on festive occasions.

Gulkhand Semiya Kheer


Ingredients - 

Evaporated Milk 1 1/2 cups
Milk 1/2 cup
Vermicelli / Semiya 2 Tbsp
Sugar 2 Tbsp
Gulkhand 1 Tbsp
Cardamom Powder 1/4 tsp
Almonds and Cashews, crushed 2 Tbsp

Gulkhand Semiya Kheer

Method Of Preparation -


In a pan, boil the evaporated milk and the regular milk and add the semiya. Let the semiya cook for about 3-4 minutes.

Add in crushed almonds and cashews, sugar, gulkhand and cardamom powder.

Let the kheer boil for about 5 minutes.

Remove from heat, garnish with roasted cashews and gulkhand and serve warm. The kheer can be chilled and served cold as well.


BMLogo


Preparation Time 20 minutes
Serves 2

Read More

Aksan

H for Haiti. When I was thinking about the countries with the letter H, Haiti came first to my mind. And Haiti reminds me of my dear blogger friend, Mir. So I hopped onto her space and picked up this delectable beverage which apparently is served to kids.

This is essentially Cornmeal Payasam/kheer and so I was pretty confident that it would be accepted by the kids. 

This turned out so good that at the end of the day all of us were peeping into the refrigerator to see if there are any leftovers. Each of us would go sneaking a spoon here and a spoon there until I figured that the kids left an empty bowl in the refrigerator!!


Recipe Source here
Ingredients - 

Cornmeal 1/4 cup
Water 1 1/2 cups
Evaporated Milk 5 oz can
Milk 1/2 cup
Sugar 1/4 cup + more if needed
Star Anise 1
Cinnamon 1 inch stick


Aksan

Method Of Preparation -


In a sauce pan, bring 1 1/4 cup of water along with star anise and cinnamon to boil.

Meanwhile, make a thin past with the remaining water and cornmeal.

Pour in the cornmeal paste into the boiling water while constantly stirring.

After about 5 minutes when the cornmeal is cooked well, remove the star anise and cinnamon stick.

Pour in the evaporated milk and regular milk along with sugar.

Let it simmer for a few minutes. Remove from heat.

Refrigerate and serve chilled.


Preparation Time 15 min
Serves 2-3

Read More

Mango Kulfi


Last summer I had prepared Mango Rabdi/Mango Kulfi and I had also prepared Mango Kulfi the easier way. Ironically, I had misplaced the pictures in another computer and so totally forgot about these kulfis. 


Yesterday when I was looking for some files in my other computer, I came across these pictures and dreamt of summer [:)] and decided to post it for Day 7 of  BM 12. Don't you think it is a crime to forget about such a delightful dessert?? 


Ingredients - 


Evaporated Milk 1 can (approx 350 ml) - I used Fat Free
Sweetened Condensed Milk 1/2 cup - I used Fat Free
Whipped Cream 1 cup (I didn't use)
Mango Pulp 1 cup (I used canned but fresh mango pulp works best!)
Cardamom Powder 1 tsp (Optional)
Chopped Nuts 3 Tbsp


Mango Kulfi


Method Of Preparation -


Mix the evaporated milk and the condensed milk and bring to a boil. Cool the mixture and then whisk whipped cream (if using) and mango pulp.


Mix in the chopped nuts.


Freeze the above mixture for about an hour or two. When it is just about to solidify, remove and whisk again so that ice crystals don't form.


Now pour into popsicle moulds and cover and freeze them over night.


To unmould, run in hot water or dip in hot water and slowly twist off and remove. 


Enjoy on a summer afternoon or for a dessert!! Kids and Adults enjoy this alike!!


Check out the other Blogging Marathoners doing BM# 12. 

Sending these Kulfis to 

 Kid's Delight hosted by Edible Entertainment and 


Suma's CEDD  hosted for Raven 


A re-cap of the past 2 weeks of Blogging Marathon - 


Week 1 - Delicious Dals
Day 7 - Kudumulu ~ Toor Dal-Jaggery Dumplings
Day 6 - Red Chori Beans - Bottle Gourd Sambar
Day 5 - Toor Dal Chutney ~ Pigeon Pea Chutney ~ Kandi Pachadi
Day 4 - Masala Vada ~ Chana Dal Fritters
Day 3 - Bottle Gourd - Lentil Curry | Sorrakaya-Senagapappu Koora
Day 2 - Kabuli Chana Fry ~ Garbanzo Beans Fry
Day 1 - Mixed Lentil Khichdi


Week 2 - Kid's Delight - Something Sweet

Day 7 - Mango Kulfi - The Easier Way
Day 6 - Godhuma Rava Halwa ~ Wheat Rava Halwa
Day 5 - Vegan Pumpkin Scones
Day 4 - Vegan Chocolate Cupcake
Day 3 - Vegan Sweet Potato Kheer
Day 2 - Carrot Poli ~ Carrot Bobbattu
Day 1  - Eggless Orange-Corn Muffins

Preparation Time 10 min + Cooling Time 7-8 hours
Makes 6-8 (depending on the size of popsicle moulds)

Read More

Happy Mother's Day!! 

Before I was a Mom, 

I never tripped over toys 

or forgot words to a lullaby. 
I didn't worry whether or not 
my plants were poisonous. 
I never thought about immunizations.

Before I was a Mom, 
I had never been puked on. 
Pooped on. 
Chewed on. 
Peed on. 
I had complete control of my mind 
and my thoughts. 
I slept all night.

Before I was a Mom, 
I never held down a screaming child 
so doctors could do tests. 
Or give shots. 
I never looked into teary eyes and cried. 
I never got gloriously happy over a simple grin. 
I never sat up late hours at night 
watching a baby sleep. 

Before I was a Mom, 
I never held a sleeping baby just because 
I didn't want to put her down. 
I never felt my heart break into a million pieces 
when I couldn't stop the hurt. 
I never knew that something so small 
could affect my life so much. 
I never knew that I could love someone so much. I never knew I would love being a Mom. 

Before I was a Mom, 
I didn't know the feeling of 
having my heart outside my body.. 
I didn't know how special it could feel 
to feed a hungry baby. 
I didn't know that bond 
between a mother and her child. 
I didn't know that something so small 
could make me feel so important and happy. 

Before I was a Mom, 
I had never gotten up in the middle of the night 
every 10 minutes to make sure all was okay. 
I had never known the warmth, 
the joy, 
the love, 
the heartache, 
the wonderment 
or the satisfaction of being a Mom. 
I didn't know I was capable of feeling so much, 
before I was a Mom 

I couldn't have expressed my feelings so well but for these words which were passed on by a wonderful person!! So here is an Eggless Chocolate Sponge Cake to celebrate !!
Originally I planned on making a Black Forest Cake, but later on came to realize that I had run out of whipped cream :( [So thats for another occasion] Nevertheless, we enjoyed it plain without any frills!! 


Eggless Chocolate Sponge Cake


Source - Vahchef
Ingredients -


Evaporated Milk 1/2 cup (I used fat free)
Powdered Sugar between 3/4 cup to 1 cup
Butter 1/4 cup
Oil 1/4 cup


Whole Wheat Flour 1 cup
All Purpose Flour 1/4 cup
Unsweetened Cocoa Powder 1/4 cup
Baking Powder 1/2 Tbsp
Club Soda 1/2 cup (Coke, Pepsi or other aerated drinks can be used too I chose the plain soda)


Method Of Preparation -


Cream together evaporated milk, powdered sugar, butter and oil for a couple of minutes or more and keep aside.


Meanwhile, preheat the oven to 400 F and prepare a cookie tray by greasing it or lining a parchment paper. [Can be made in a 7 or 8 inch cake tin too!]


In another mixing bowl, sift whole wheat flour, all purpose flour, cocoa powder and baking powder and mix the above creamed liquid ingredients slowly until there are no lumps.


Finally add the carbonated water (club soda) and mix gently to get a smooth batter. Tap the cookie tray on the counter top to remove any unnecessary air bubbles in the batter.


Pour the batter into the prepared cookie tray and spread evenly.


Place the cookie tray in the center rack of the oven and bake it for 15 min.


Switch off the oven and leave the cookie tray for another 15 min.


Eggless Chocolate Sponge Cake


Remove from the oven, let it cool, cut it, decorate it and enjoy however you want!!
I sprinkled some powdered sugar on the cake to decorate!


Preparation Time 10 min, Baking Time 15 min, Cooling in the oven 15 min
Makes a 13 X 9 X 1 inch sheet

Read More

How many of us buy the fresh/frozen khoya/mawa from the stores? I personally never bought but know many who do. I found this simple recipe to make khoya at home in less than 10 min. The process is very simple if you have a microwave, else it might be a little more time consuming but still do-able. If you are anything like me, you will want to prepare this and store in the freezer so you will have it handy when you crave for a dessert!! Give it a shot and you will be glad just like me :) 
Watch out for a dessert I made with this khoya !!


Home MAde Khoya


Recipe Source - Multiple sites on the internet
Ingredients -


Milk Powder 1 1/2 cups [1 cup=240 ml ] (I used non fat milk powder)
Evaporated Milk 12 fl oz (350 ml)


Method Of Preparation -


In a microwave safe bowl, mix milk powder and evaporated milk without any lumps.


Boil the mixture in the microwave for 3-4 min and then remove from the m'wave.


Mix well and microwave in 30 sec intervals until the mixture solidifies into khoya.


It took me approximately 8 min. But the cooking time might vary depending on the power of the microwave.


Home MAde Khoya


Cool the khoya and use where necessary. It stays fresh in the refrigerator for about 4-5 days and upto a few months in the freezer.


Preparation Time 8 min
Yields 1 1/2 cups

Read More
Posted by Harini on Monday, April 18, 2011

This has always been one of our family favourite desserts. Both my husband and I bought two tins of this sweet every time we went to New Jersey (from one of our favourite sweet shops) and competed with each other to finish it off. Till very recently, I never really thought I would make it at home but thanks to the very exuberant Vahchef who made it look so simple that I ventured to try it out. I made some small changes to the original recipe and it came out really well.


Ingredients -


The Ras (or Rabadi)
3 cups Whole Milk
1 tin Evaporated Milk (optional)
Sugar 1 cup
Almonds, Cashews and Pecans, a fistful (optional)
Pistachios and Cardamom (elaichi) powder - for garnish


For the Paneer (chenna or cheese)-
8 cups Milk
1 medium sized lemon or 3 tablespoons of vinegar diluted in water
8-10 ice cubes


For the sugar syrup -
6 cups water
1 cup sugar

Method of preparation -

To Prepare the Ras (Rabadi) -

Mix the evaporated milk and regular whole milk in preferably a non-stick sauce pan and bring it to a boil while constantly stirring it so it doesn't stick to the pan.
Add the evaporated milk to speed up the process. You could use another 2-3 cups of whole milk instead.

Grind all the nuts into as fine a powder as possible and and add it to the milk. I add the ground powder to richen the rabadi and also to thicken the milk. This is however, purely optional.


Add the sugar and keep stirring it continuously till the milk thickens slightly. Turn off heat


To Prepare the Paneer and sugar syrup-
While the Rabadi is heating up, take milk in another vessel and bring it to a boil just as for the Rabadi.


Squeeze an entire lemon into the milk to start the process of curdling and switch off the heat.

Wait for about 5 minutes or till you find the milk starting to turn clear. Immediately add the ice cubes so as to stop it from curdling further. This process is very important as you don't want the cheese to harden.


Drain the whey and the paneer (chenna) into a thin muslin cloth. Holding the four ends of the cloth, slightly twist the cloth and hang the cloth at a height so that the whey drains from the paneer. Leave it aside for about 20-30 minutes.


Take the hung muslin cloth and place it on another clean cloth and use it to knead the chenna gently for about 5 minutes. This would ensure that there is no moisture in it and also make it soft and easy to prepare the cheese balls.

Remove the cheese into a wide plate and make small balls out of it and press them into small patties. Ensure that they are smooth and not cracked.


While kneading the paneer, prepare the sugar syrup as well. Take water in another vessel and add sugar to it and bring it to a rolling boil. The syrup should be boiling for atleast a minute or two. Add the patties slowly into the boiling sugar syrup and close it with a lid. Let it boil for about 8-10 minutes. The cheese patties should double in size and be very light and soft to touch.

Remove them into a vessel of warm water and let them sit for a minute and slightly squeeze the water out of it and add it to the rabadi or ras and let it absorb the sweetness of it. Refrigerate the Rasmalai and it is ready to be served when chilled.

Note : The same process applies to the preparation of Rasgullas as well except that the cheese balls are served along with the sugar syrup instead of adding them to the rabadi.


Serves 4 Adults (Makes about 24 balls)


Preparation Time 2-1/2 hrs

Read More
Posted by Jaya on Sunday, March 14, 2010
Related Posts Plugin for WordPress, Blogger...

Search Tamalapaku


Follow me

Follow Me on Pinterest

Tamalapaku on Facebook

Subscribe via Email


Enter your email address:

Delivered by FeedBurner


On Our Menu


Archives

Followers

Member Of

All recipes are on Petitchef
Top Food Blogs
Blog Directory